Clasa Java GridLayout este folosită pentru a aranja componentele într-o grilă dreptunghiulară. În fiecare dreptunghi este afișată o componentă.
Constructorii clasei GridLayout
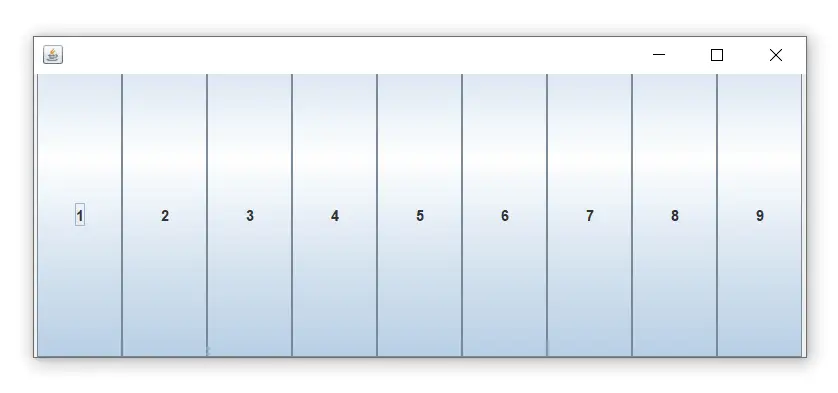
Exemplu de clasă GridLayout: Utilizarea constructorului GridLayout().
Constructorul GridLayout() creează un singur rând. Următorul exemplu arată utilizarea constructorului fără parametri.
arhitectura de retea
Nume de fișier: GridLayoutExample.java
// import statements import java.awt.*; import javax.swing.*; public class GridLayoutExample { JFrame frameObj; // constructor GridLayoutExample() { frameObj = new JFrame(); // creating 9 buttons JButton btn1 = new JButton('1'); JButton btn2 = new JButton('2'); JButton btn3 = new JButton('3'); JButton btn4 = new JButton('4'); JButton btn5 = new JButton('5'); JButton btn6 = new JButton('6'); JButton btn7 = new JButton('7'); JButton btn8 = new JButton('8'); JButton btn9 = new JButton('9'); // adding buttons to the frame // since, we are using the parameterless constructor, therfore; // the number of columns is equal to the number of buttons we // are adding to the frame. The row count remains one. frameObj.add(btn1); frameObj.add(btn2); frameObj.add(btn3); frameObj.add(btn4); frameObj.add(btn5); frameObj.add(btn6); frameObj.add(btn7); frameObj.add(btn8); frameObj.add(btn9); // setting the grid layout using the parameterless constructor frameObj.setLayout(new GridLayout()); frameObj.setSize(300, 300); frameObj.setVisible(true); } // main method public static void main(String argvs[]) { new GridLayoutExample(); } } Ieșire:
Exemplu de clasă GridLayout: Utilizarea constructorului GridLayout(int rows, int columns)
Nume de fișier: MyGridLayout.java
import java.awt.*; import javax.swing.*; public class MyGridLayout{ JFrame f; MyGridLayout(){ f=new JFrame(); JButton b1=new JButton('1'); JButton b2=new JButton('2'); JButton b3=new JButton('3'); JButton b4=new JButton('4'); JButton b5=new JButton('5'); JButton b6=new JButton('6'); JButton b7=new JButton('7'); JButton b8=new JButton('8'); JButton b9=new JButton('9'); // adding buttons to the frame f.add(b1); f.add(b2); f.add(b3); f.add(b4); f.add(b5); f.add(b6); f.add(b7); f.add(b8); f.add(b9); // setting grid layout of 3 rows and 3 columns f.setLayout(new GridLayout(3,3)); f.setSize(300,300); f.setVisible(true); } public static void main(String[] args) { new MyGridLayout(); } } Ieșire:
descărcați acest exempluExemplu de clasă GridLayout: Utilizarea GridLayout(int rows, int columns, int hgap, int vgap) Constructor
Următorul exemplu inserează spații orizontale și verticale între butoane folosind constructorul parametrizat GridLayout(int rows, int columns, int hgap, int vgap).
Nume de fișier: GridLayoutExample1.java
moștenire java
// import statements import java.awt.*; import javax.swing.*; public class GridLayoutExample1 { JFrame frameObj; // constructor GridLayoutExample1() { frameObj = new JFrame(); // creating 9 buttons JButton btn1 = new JButton('1'); JButton btn2 = new JButton('2'); JButton btn3 = new JButton('3'); JButton btn4 = new JButton('4'); JButton btn5 = new JButton('5'); JButton btn6 = new JButton('6'); JButton btn7 = new JButton('7'); JButton btn8 = new JButton('8'); JButton btn9 = new JButton('9'); // adding buttons to the frame // since, we are using the parameterless constructor, therefore; // the number of columns is equal to the number of buttons we // are adding to the frame. The row count remains one. frameObj.add(btn1); frameObj.add(btn2); frameObj.add(btn3); frameObj.add(btn4); frameObj.add(btn5); frameObj.add(btn6); frameObj.add(btn7); frameObj.add(btn8); frameObj.add(btn9); // setting the grid layout // a 3 * 3 grid is created with the horizontal gap 20 // and vertical gap 25 frameObj.setLayout(new GridLayout(3, 3, 20, 25)); frameObj.setSize(300, 300); frameObj.setVisible(true); } // main method public static void main(String argvs[]) { new GridLayoutExample(); } } Ieșire:
